Your vehicle’s braking system serves as its most critical safety feature. Every time you press the brake pedal, you trust that your car will stop safely and effectively. However, brake pads wear down over time due to friction, heat, and everyday driving habits. Ignoring them can lead to dangerous driving conditions and expensive repair bills.
Taking the time to inspect your brake pads at home empowers you to take charge of your vehicle’s maintenance. This guide on how to check brake pads will walk you through exactly how to check your brake pads safely and efficiently.

You will learn the benefits of regular inspections, the tools you need to get the job done, a detailed 10-step inspection process, and common mistakes you must avoid along the way.
What are the Benefits of Regular Checks?
Routinely inspecting your brake pads offers several major advantages for both your wallet and your safety. First and foremost, it guarantees that your vehicle retains maximum stopping power. Worn brake pads drastically increase your stopping distance, which can make the difference between a close call and a serious accident.
Second, catching worn brake pads early saves you a significant amount of money. If your pads wear down to the metal backing plate, they will gouge and ruin your brake rotors. Replacing just the pads is a relatively cheap maintenance task, while replacing both pads and rotors costs significantly more. Finally, regular checks give you peace of mind. Knowing the exact condition of your braking system lets you drive confidently without worrying about unexpected failures.
What Will You Need?
Before you start, gather the right tools. Having everything within reach makes the process smooth and keeps you safe. You will need:
- A sturdy car jack
- Two heavy-duty jack stands
- A lug nut wrench or impact driver
- A bright flashlight
- A brake pad measuring gauge or a small ruler
- Safety glasses and heavy-duty mechanic gloves
- Wheel chocks (to prevent rolling)
10 Easy Steps on How to Check Brake Pads
Performing a brake pad inspection requires patience and attention to detail. Follow these ten steps carefully to thoroughly evaluate the health of your braking system.
Step 1: Park on a Flat, Level Surface
Safety always comes first when working on any vehicle. You must park your car on a completely flat, solid surface like a concrete garage floor or a paved driveway. Never attempt to lift a vehicle on dirt, grass, or gravel, as the jack can easily sink or shift, causing the car to fall. Once you have positioned the car on a flat surface, turn off the engine, put the vehicle in park (or in gear for a manual transmission), and firmly engage the parking brake. Place wheel chocks behind the rear tires to ensure the vehicle cannot roll backward while you are working on the front end.

Step 2: Loosen the Lug Nuts
Before you lift the car off the ground, you need to break the tension on the wheel’s lug nuts. Grab your lug wrench and turn each lug nut counterclockwise just enough to loosen it. Do not remove the lug nuts entirely at this stage; just break their resistance. If you try to loosen the lug nuts after the car is in the air, the wheel will simply spin freely, making it nearly impossible to get the leverage you need. Applying force while the tire is firmly planted on the ground uses the weight of the vehicle to your advantage.
Step 3: Lift the Vehicle Securely
Locate the proper jacking points under your vehicle. You can usually find these reinforced metal areas just behind the front wheels or just ahead of the rear wheels. Consult your owner’s manual if you are unsure where they are located. Slide your floor jack under the correct lifting point and pump the handle until the wheel lifts completely off the ground. Immediately place a heavy-duty jack stand under a secure frame rail nearby and slowly lower the vehicle’s weight onto the stand. Never put any part of your body under a vehicle supported only by a hydraulic jack.
Step 4: Remove the Wheels
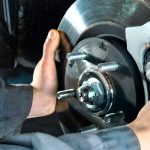
With the vehicle resting securely on the jack stands, you can now fully remove the lug nuts. Since you already loosened them in step two, they should spin off easily by hand or with a wrench. Carefully slide the heavy wheel off the hub assembly. Roll the wheel aside and lay it flat on the ground so it does not accidentally tip over and cause injury or damage. You now have full, unobstructed access to the inner workings of your wheel well, including the brake caliper, the rotor, and the brake pads themselves.
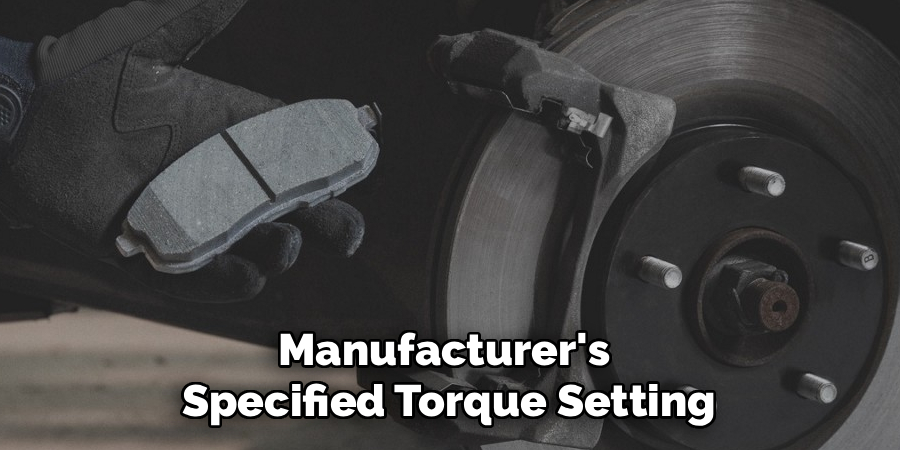
Step 5: Locate the Brake Caliper and Pads
Take a moment to familiarize yourself with the braking components in front of you. The large, shiny metal disc is the brake rotor. Clamped over the top or side of this rotor is a heavy metal mechanism called the brake caliper. The caliper acts like a mechanical hand that squeezes the brake pads against the rotor to stop the car. Look through the opening at the top or front of the caliper. You will see two brake pads—one positioned on the inside of the rotor and one on the outside. These pads are the friction materials you need to inspect.
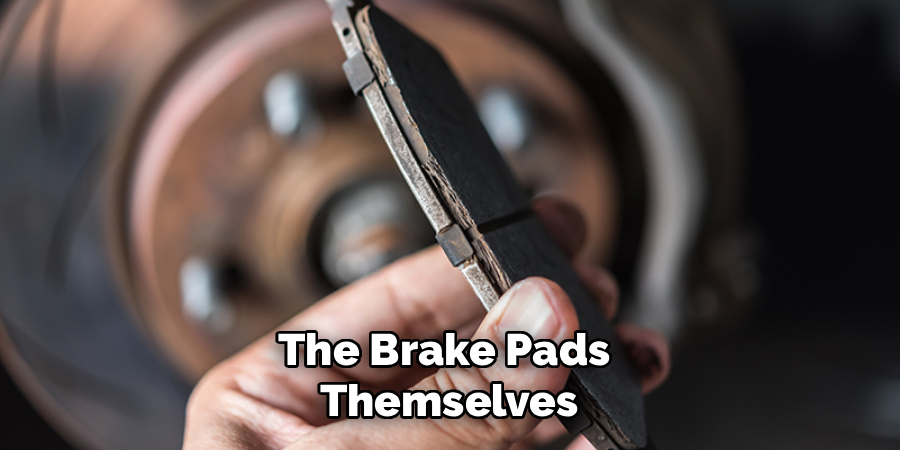
Step 6: Perform a Visual Inspection
Shine your flashlight directly into the caliper opening to get a clear view of the brake pads. You are looking for the friction material, which is the thick layer attached to the metal backing plate of the pad. A brand-new brake pad typically holds about 10 to 12 millimeters of friction material. Visually estimate how much of this material remains. If the pad looks thinner than a standard pencil eraser, it requires immediate replacement. Also, check for any obvious signs of cracking, crumbling, or severe glazing on the surface of the pad.
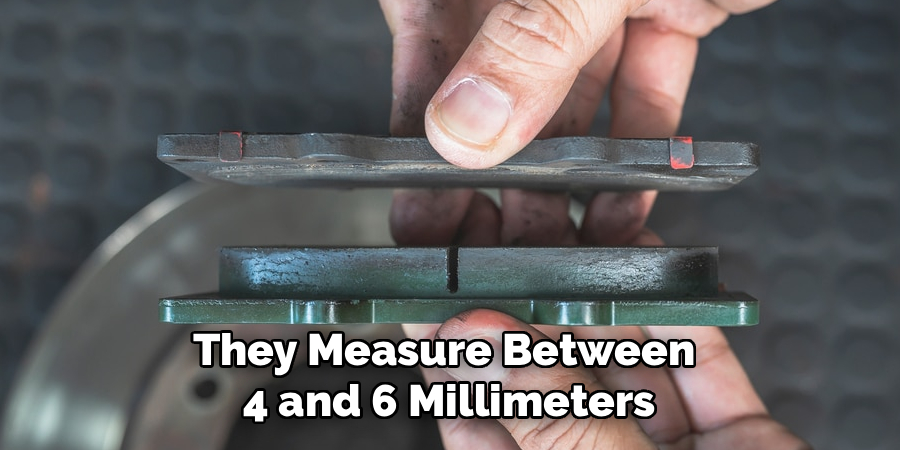
Step 7: Measure the Brake Pad Thickness
Visual estimates are helpful, but precise measurements are always better. Take your brake pad measuring gauge or a small ruler and insert it through the caliper opening. Place the measuring tool directly against the friction material, making sure not to include the metal backing plate in your measurement. If the friction material measures 3 millimeters or less, you need to replace the pads immediately to maintain safe braking performance. If they measure between 4 and 6 millimeters, they are nearing the end of their life, and you should plan to replace them soon.
Step 8: Check for Uneven Wear Patterns
Inspect both the inner and outer brake pads to ensure they are wearing down at the same rate. If one pad is significantly thinner than the other, you likely have a mechanical problem with your braking system. Uneven wear usually indicates that the caliper slide pins lack lubrication or have seized completely, preventing the caliper from applying even pressure. If you notice uneven wear, simply replacing the pads will not solve the underlying issue. You will need to clean, lubricate, or replace the caliper components to restore proper function.
Step 9: Inspect the Brake Rotor Condition
While checking the pads, you should also take a close look at the brake rotor. The flat surface of the rotor should look relatively smooth and shiny. Run your gloved finger gently across the surface. If you feel deep grooves, heavy scoring, or severe rust buildup, the rotor may need to be resurfaced or completely replaced. Additionally, look for any blue discoloration on the metal, which indicates that the brakes have overheated at some point. Installing new brake pads on damaged or severely warped rotors will result in poor braking performance and excessive noise.
Step 10: Reinstall Wheels and Lower the Vehicle
Once you finish your inspection, carefully lift the wheel back onto the hub assembly, aligning the holes with the wheel studs. Thread the lug nuts on by hand in a star pattern to ensure the wheel sits flush against the hub. Tighten them as much as you can with your wrench while the wheel is in the air. Use your floor jack to lift the car slightly, remove the jack stand, and slowly lower the vehicle back to the ground. Finally, use a torque wrench to tighten the lug nuts to the manufacturer’s specified torque setting in that same star pattern.
5 Things You Should Avoid
- Avoid Working on Hot Brakes: Brake components generate extreme heat during operation. Never attempt to check your brake pads immediately after driving, as you can easily suffer severe burns. Always let the vehicle sit for at least an hour before touching the wheels or calipers.
- Avoid Relying Solely on a Hydraulic Jack: Hydraulic seals can fail without warning. Never place any part of your body under a vehicle unless it is securely supported by rated jack stands resting on a solid, level surface.
- Avoid Breathing in Brake Dust: Brake assemblies collect a massive amount of fine, harmful dust. Never blow this dust away with compressed air or your mouth. Instead, use a specialized aerosol brake cleaner to gently wash the debris away.
- Avoid Getting Grease on the Rotors: The oils from your skin, anti-seize compounds, and general garage grease can ruin the friction properties of your brakes. Always wear clean gloves and avoid touching the flat surface of the brake rotor.
- Avoid Uneven Lug Nut Tightening: Failing to tighten your wheel’s lug nuts in a star pattern can warp your brake rotors over time. Always use a torque wrench to tighten them to the exact specifications listed in your vehicle’s manual.
Conclusion
Regularly checking your brake pads stands out as one of the most rewarding and important maintenance tasks you can perform at home.
By following the guide on how to check brake pads, you ensure that your vehicle remains safe, responsive, and ready for the road. You also protect your wallet from the heavy costs associated with replacing damaged brake rotors and calipers.
Keep your tools handy, maintain a regular inspection schedule, and never compromise when it comes to the safety of your braking system.
About
Ora Hayes is a distinguished figure in the world of DIY Thecarfixes, with over a decade of expertise in automotive diagnostics and high-performance maintenance. Her professional focus lies in merging mechanical precision with modern digital tools, fostering repair solutions that are both cost-effective and highly reliable. As the author of Thecarfixes, Ora Hayes delves into the art and science of automotive restoration, inspiring car owners and hobbyist mechanics alike.
Education
RMIT University (Melbourne, Australia) Associate Degree in Automotive Engineering — Focus on vehicle dynamics, industry-driven repair protocols, and advanced diagnostics. Gained hands-on experience with traditional mechanical tools and modern ECU remapping software.
Nottingham Trent University (United Kingdom) Bachelor’s in Mechanical Design and Automotive Engineering (Honors) — Specialized in automotive systems with a focus on blending technical engineering with everyday usability. Participated in industry projects, working with leading automotive manufacturers to gain real-world insights into vehicle longevity.
Publications and Impact
In Thecarfixes, Ora Hayes shares her insights on troubleshooting complex engine issues, material durability, and strategies for efficient garage setups. Her writing bridges the gap between professional mechanic knowledge and the home enthusiast’s needs, making it a must-read for both everyday drivers and seasoned gearheads.