We dedicate massive amounts of energy to ensuring our delicate tomato plants receive adequate sunlight, yet we often completely neglect the vital light emitting from our own vehicles. Driving to the local wholesale nursery before the sun rises requires excellent road visibility to keep you and your heavy bags of potting soil perfectly safe. When your vehicle lenses become cloudy and yellowed from intense sun exposure, your nighttime visibility drops drastically.

If you are wondering exactly how to clean headlights on a car, you have found the perfect resource. You do not need expensive mechanical tools or complicated chemical kits to restore that original factory shine. This beginner-friendly guide walks you safely through the entire restoration process using common items you probably already have sitting under your kitchen sink. We will cover preparing the surface, removing the stubborn oxidation, and sealing the plastic to prevent future damage. Let us put down the heavy gardening shears, grab a soft microfiber towel, and restore your vehicle’s brightness!
Step-by-Step Guide: How to Clean Headlights on a Car
Step 1: Gather Your Household Cleaning Supplies
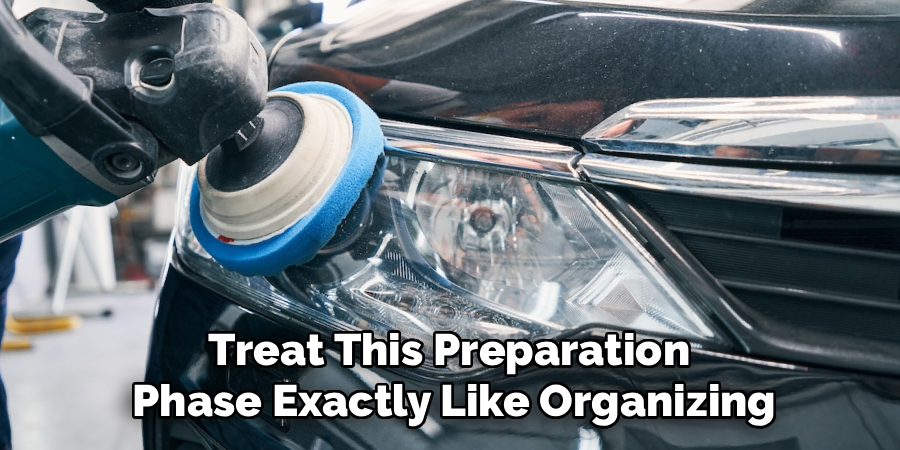
Before you begin scrubbing your vehicle, you must gather a few basic household supplies to make this maintenance task incredibly simple. You will need a standard box of baking soda, plain white vinegar, a roll of blue automotive painter’s tape, and several clean microfiber towels. Grab a small plastic bucket and fill it halfway with warm water mixed with a few drops of mild dish soap. Having all your materials staged on the driveway prevents you from frantically searching for tools while your cleaning solutions dry prematurely on the plastic. Treat this preparation phase exactly like organizing your seeds before the spring planting season begins.
Step 2: Wash the Exterior Plastic Surface
You must thoroughly wash the front plastic housing to remove any loose abrasive dirt, dead bugs, or sticky tree sap before applying your abrasive polishing compounds. Dip one of your clean microfiber towels into the warm soapy water and aggressively wash the entire front lens area. Removing this loose surface debris prevents you from accidentally grinding sharp sand particles directly into the soft plastic covering, which causes permanent, irreversible scratches. Rinse the soapy residue away using a standard garden hose and dry the area completely with a fresh towel. Starting with a perfectly clean surface ensures your homemade baking soda polish works at maximum efficiency.
Step 3: Tape Off the Surrounding Painted Metal
Protecting your expensive automotive paint job remains absolutely critical when performing any aggressive exterior restoration work on your driveway. Take your roll of blue painter’s tape and carefully mask off the painted metal fenders directly surrounding the plastic lens housing. Apply the sticky tape in long, smooth strips, ensuring you cover the delicate rubber weather stripping as well. If your abrasive baking soda paste accidentally touches the surrounding metal, it will quickly scratch the clear coat and leave permanent dull spots. Taking your time during this crucial masking phase acts just like laying down protective cardboard weed barriers before pouring fresh wood mulch in your garden.

Step 4: Mix the Abrasive Polishing Paste
Creating the perfect polishing compound requires mixing two very common household kitchen ingredients into a thick, highly effective chemical paste. Pour roughly half a cup of standard baking soda into a small plastic bowl, then slowly add tiny splashes of plain white vinegar. The mixture will immediately begin fizzing and bubbling aggressively, which is a completely normal chemical reaction. Stir the bubbling mixture gently with a wooden spoon until it forms a thick, spreadable consistency that resembles heavy cake frosting. This slightly abrasive paste will gently grind away the damaged, yellowed layer of plastic without causing any deep structural damage to the thick protective lens.
Step 5: Master headlights on a car Safely
Applying your homemade polishing compound correctly determines the ultimate success of your weekend restoration project. Scoop a generous amount of the thick baking soda paste onto a fresh, slightly damp microfiber towel. Press the towel firmly against the cloudy plastic and begin rubbing the mixture aggressively using tight, overlapping circular motions. You must apply a significant amount of physical elbow grease to cut through the thick layer of oxidized plastic. Work systematically from one side of the housing to the other, ensuring you polish every single square inch of the curved surface. Spend at least five solid minutes polishing each lens to achieve the absolute best visual results.
Step 6: Rinse and Inspect the Clear Plastic
After scrubbing the surface extensively, you must wash the abrasive paste away to inspect your hard work and evaluate the visual improvement. Grab your garden hose and gently spray the entire front housing with clean water, watching the milky white residue wash down the driveway. Dry the plastic completely using a clean towel and inspect the surface carefully under bright natural sunlight. The lens should look dramatically clearer and feel incredibly smooth to the touch. If you still notice stubborn yellow patches or severe cloudiness near the edges, simply mix another batch of baking soda paste and repeat the aggressive scrubbing process until you achieve perfection.

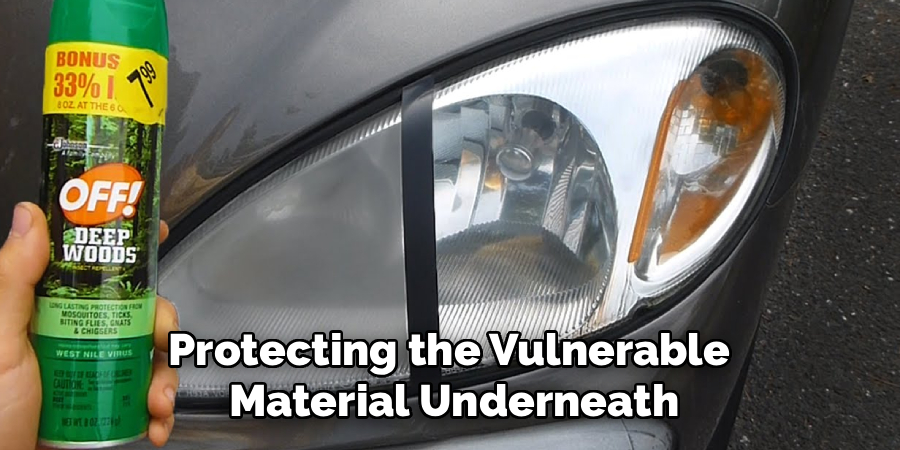
Step 7: Apply a Protective UV Sealant
The final critical phase of this driveway maintenance project involves protecting the freshly exposed plastic from future solar damage. The intense ultraviolet rays from the sun caused the yellowing initially, and leaving the raw plastic exposed guarantees the cloudiness will return within a few short months. Purchase a high-quality automotive UV sealant spray from your local auto parts store. Spray a light, even coat of the protective chemical directly onto the clean, dry lens and wipe it smooth with a fresh microfiber towel. This invisible chemical barrier acts exactly like a heavy layer of organic mulch, protecting the vulnerable material underneath from harsh environmental elements.
Frequently Asked Question
Can I Use Toothpaste To Clear Cloudy Lenses?
- Yes, standard white toothpaste serves as an excellent, highly accessible alternative to mixing your own baking soda paste.
- Toothpaste contains mild silica abrasives designed to remove tough plaque from your teeth without scratching delicate enamel.
- These exact same abrasives work wonders on oxidized automotive plastics when applied with a damp cloth and heavy pressure.
- Avoid using gel-based toothpastes, as they lack the necessary gritty texture to cut through heavy yellow oxidation effectively.
- Always finish the toothpaste method by applying a dedicated UV sealant to protect your hard work.
How Long Does The Clarity Last?
- The longevity of your restoration depends entirely on whether you apply a proper chemical UV sealant after polishing.
- If you simply polish the plastic and leave it completely bare, the yellow cloudiness will return in three months.
- Applying a premium synthetic sealant extends the crystal-clear finish for up to an entire year under normal driving conditions.
- Parking your vehicle inside a dark garage or under a shaded carport drastically reduces daily solar damage and extends clarity.
- Reapplying the protective sealant every six months guarantees your lenses remain perfectly transparent for years.
Do I Need Professional Polishing Tools?
- You absolutely do not need expensive electric buffers or specialized mechanical polishing wheels to achieve fantastic visual results.
- A standard microfiber towel and heavy physical elbow grease will easily cut through most moderate cases of plastic oxidation.
- However, if the yellowing is incredibly severe, utilizing a cordless power drill with a foam polishing attachment saves time.
- Operating power tools requires extra caution, as spinning a dry buffing pad too fast will physically melt the plastic housing.
- For most casual DIY enthusiasts, the manual hand-polishing method remains the absolute safest and most reliable approach.
Will Vinegar Harm The Automotive Paint?
- Plain white vinegar is mildly acidic and can potentially degrade your expensive clear coat if left sitting for extended periods.
- This is exactly why applying blue painter’s tape around the plastic housing remains a mandatory preparation step.
- If you accidentally spill the vinegar mixture onto your painted fender, immediately flush the area with copious amounts of water.
- Washing the vehicle with automotive soap immediately after finishing your restoration project neutralizes any hidden acidic residue perfectly.
- Treating your cleaning chemicals with basic respect ensures your driveway project remains completely safe and highly successful.
When Should I Replace The Entire Unit?
- Sometimes the structural damage extends far beyond basic surface oxidation, requiring a complete mechanical replacement of the entire housing.
- If you notice heavy water condensation pooling directly inside the sealed plastic chamber, the internal weather gaskets have failed completely.
- Deep physical cracks running through the thick plastic lens cannot be repaired with baking soda and require brand new hardware.
- If the internal reflective mirror material begins peeling or flaking away, no amount of exterior polishing will restore the brightness.
- Replacing the entire housing guarantees maximum nighttime safety when the original factory unit becomes structurally compromised beyond repair.
Conclusion
Maintaining your vehicle requires the exact same dedication and consistent effort you apply to cultivating your thriving backyard vegetable garden. By taking the time to gather simple household ingredients, tape off your delicate paint, and scrub away the stubborn oxidation, you guarantee a remarkably safe driving environment. You no longer have to squint nervously through the darkness while hauling heavy bags of premium compost home from the local hardware store.
Understanding exactly how to clean headlights on a car transforms a potentially expensive mechanic visit into a highly manageable, incredibly simple weekend chore. The noticeable improvement in your nighttime visibility serves as a fantastic, deeply comforting reward for your careful physical efforts. Remove the blue painter’s tape, pack your gardening gloves into the trunk, and drive confidently toward your next botanical adventure knowing your path remains perfectly illuminated!
About
Ora Hayes is a distinguished figure in the world of DIY Thecarfixes, with over a decade of expertise in automotive diagnostics and high-performance maintenance. Her professional focus lies in merging mechanical precision with modern digital tools, fostering repair solutions that are both cost-effective and highly reliable. As the author of Thecarfixes, Ora Hayes delves into the art and science of automotive restoration, inspiring car owners and hobbyist mechanics alike.
Education
RMIT University (Melbourne, Australia) Associate Degree in Automotive Engineering — Focus on vehicle dynamics, industry-driven repair protocols, and advanced diagnostics. Gained hands-on experience with traditional mechanical tools and modern ECU remapping software.
Nottingham Trent University (United Kingdom) Bachelor’s in Mechanical Design and Automotive Engineering (Honors) — Specialized in automotive systems with a focus on blending technical engineering with everyday usability. Participated in industry projects, working with leading automotive manufacturers to gain real-world insights into vehicle longevity.
Publications and Impact
In Thecarfixes, Ora Hayes shares her insights on troubleshooting complex engine issues, material durability, and strategies for efficient garage setups. Her writing bridges the gap between professional mechanic knowledge and the home enthusiast’s needs, making it a must-read for both everyday drivers and seasoned gearheads.