When spring finally arrives, we depend heavily on our sturdy utility trucks and heavy-duty UTVs to move massive loads of organic compost, heavy terracotta pots, and delicate flower flats. Your trusty vehicle acts as the ultimate garden assistant. However, if your engine starts sputtering, blowing dark smoke, or hesitating while climbing a steep hill, your engine might be struggling with a poor combustion ratio.
Knowing exactly how to adjust fuel air mixture on fuel injection safely can instantly revive your tired transport. Modern engines use complex sensors to balance oxygen and gasoline, but you do not need to be a master mechanic to perform basic maintenance. This beginner-friendly guide walks you through the essential steps to get your hauling vehicle back in perfect working order. We will look at cleaning sensors, checking for leaks, and resetting your main computer. Let us grab our basic hand tools and prepare your favorite workhorse for another highly productive planting season!
Step-by-Step Guide:How to Adjust Fuel Air Mixture on Fuel Injection
Step 1: Gather Your Diagnostic Equipment
Before diving into the complex mechanical heart of your trusty gardening truck, you must carefully gather all your essential diagnostic tools. Treat this preparation phase exactly like organizing your favorite trowels, pruning shears, and watering cans before starting a massive backyard landscaping project. You will need a reliable digital code scanner, a standard socket wrench set, and a specialized aerosol cleaning spray designed specifically for delicate automotive sensors.
Having every single tool sitting within easy physical reach prevents you from frantically searching your messy garage floor while your hands are covered in engine grease. Preparing your workspace properly ensures a smooth, highly successful maintenance session, allowing you to focus completely on restoring your vehicle to its peak hauling performance.

Step 2: Warm Up Your Hauling Vehicle
Modern computer-controlled engines operate differently depending entirely on their current internal operating temperature. To get an accurate reading on your combustion balance, you must warm up the vehicle thoroughly before beginning any diagnostic work. Take your heavy utility truck for a brisk ten-minute drive around your local neighborhood or down a quiet country road.
This gentle physical exercise brings the thick engine oil up to its optimal operating heat and forces the internal computer into its standard closed-loop operational mode. Park your vehicle safely on a completely flat, level concrete surface and engage the heavy emergency handbrake firmly. Give the hot exhaust pipes a few minutes to cool down slightly to ensure you remain totally safe while working underneath the metal hood.
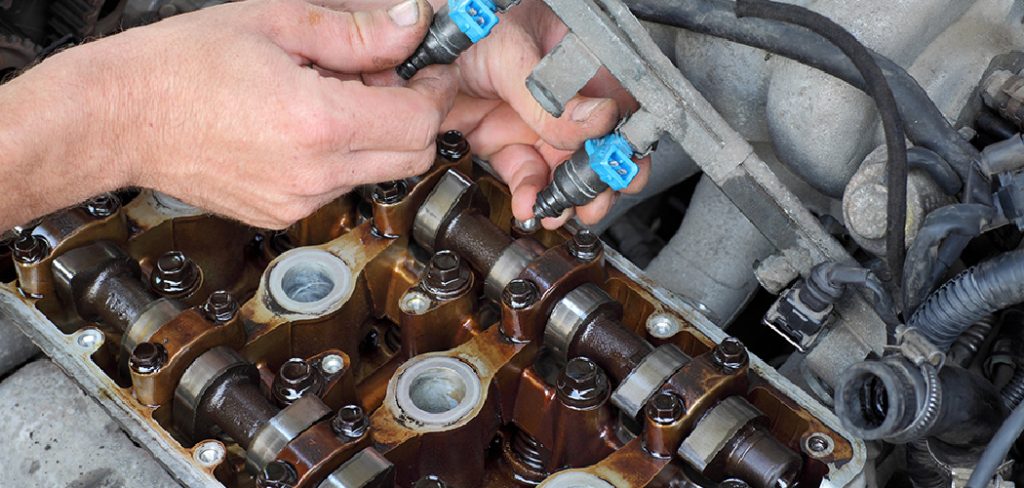
Step 3: Inspect the Mass Airflow Sensor

Your vehicle utilizes a highly sensitive electronic component called the mass airflow sensor to measure exactly how much fresh oxygen enters the engine block. The main computer relies entirely on this incoming data to calculate the precise amount of gasoline needed for perfect combustion. If this delicate sensor becomes coated in abrasive road dust or sticky pollen from your backyard trees, it sends faulty information directly to the central computer.
Open your heavy metal hood and locate the thick black plastic intake tube connecting your air filter box to the engine. Unplug the delicate electrical connector safely and loosen the metal retaining clamps. Handling this vital sensor gently prevents incredibly expensive accidental damage to your essential gardening transport.
Step 4: Exploring fuel air mixture on fuel injection
Unlike older mechanical carburetors featuring physical brass screws, modern vehicles regulate their combustion ratios entirely through an advanced digital computer system. Therefore, making changes requires communicating directly with this electronic brain rather than turning a physical metal dial. You must plug your handheld digital diagnostic scanner directly into the communication port located quietly underneath your driver-side dashboard.
This brilliant electronic tool acts exactly like a botanical soil tester, revealing the hidden chemical imbalances deeply inside your engine. Navigate through the glowing digital menus to view your live oxygen sensor data and short-term trim levels. This crucial electronic information tells you instantly whether your truck is burning too much raw gasoline or taking in far too much unmetered atmospheric oxygen.
Step 5: Clean the Vital Engine Sensors

Often, a poor combustion ratio stems directly from dirty, contaminated sensors rather than a catastrophic mechanical failure. Grab your specialized aerosol sensor cleaner and carefully spray the delicate internal wires of your mass airflow sensor. You must never touch these fragile wires with your bare fingers or harsh cotton swabs, as the physical pressure will permanently break the sensitive electronic filaments. Allow the fast-acting chemical solvent to evaporate completely in the warm afternoon sun before reinstalling the plastic unit. Cleaning these vital electronic components works exactly like wiping heavy spring mud off your greenhouse windows, allowing the internal computer to finally see the incoming oxygen levels with total clarity and absolute mechanical precision.
Step 6: Check for Hidden Vacuum Leaks
If your digital scanner still shows a lean combustion ratio after cleaning the primary sensors, you likely have a hidden vacuum leak pulling unmetered oxygen into the engine. Thick rubber hoses endure massive amounts of extreme thermal heat while you haul heavy loads of spring mulch, eventually causing them to crack and split like dry summer soil. Trace the black rubber lines connecting your intake manifold to the various engine components carefully. Squeeze the rubber gently with your bare fingers to reveal any hidden dry rot or completely disconnected plastic fittings. Swapping out a crumbling vacuum hose quickly restores total structural integrity to the entire mechanical system, ensuring your oxygen balance remains perfectly stable under heavy acceleration.
Step 7: Reset the Main Computer System
Once you finish cleaning the delicate sensors and replacing any cracked rubber hoses, you must force the electronic brain to relearn its optimal combustion parameters. You can easily reboot your entire automotive computer system by temporarily disconnecting the primary battery. Use a sturdy metal wrench to loosen the negative black battery terminal and slide the connector completely off the lead post for about fifteen minutes. Reconnect the heavy cable securely and double-check your metal clamps. This basic resetting procedure clears out all the old, faulty data profiles. The computer will now build a fresh, highly accurate map based on your clean sensors, restoring brilliant hauling power to your reliable truck just in time for the busy planting season.

Frequently Asked Questions
Can I Adjust The Mixture Manually With A Screwdriver?
- No, modern vehicles use complex digital computers to manage the oxygen and gasoline ratio automatically.
- Older garden tractors with mechanical carburetors allow for manual screw adjustments, but modern trucks do not.
- The main computer constantly reads data from the oxygen sensors to make split-second digital corrections.
- If your ratio is incorrect, you must find the broken sensor or vacuum leak causing the imbalance.
- Trying to force mechanical changes manually will simply trigger a check engine light on your dashboard.
What Happens If My Engine Runs Too Rich?
- An engine running too rich burns significantly more raw gasoline than absolutely necessary for proper combustion.
- You will likely notice thick, dark black smoke pouring constantly from your rear exhaust pipe.
- Your vehicle will suffer from terrible gas mileage, costing you extra money on trips to the local nursery.
- The excess unburned fuel can eventually destroy your expensive catalytic converter over time.
- Fixing this issue quickly protects your wallet and keeps toxic emissions out of your garden air.
How Do I Know If I Have A Vacuum Leak?
- A severe vacuum leak pulls unmetered oxygen into the engine, creating an excessively lean running condition.
- You might hear a high-pitched, distinct hissing noise coming from underneath the heavy metal hood.
- Your vehicle will likely experience a very rough, bouncy idle when parked in your residential driveway.
- The engine may hesitate or stumble aggressively when you try to accelerate up a steep hill.
- Replacing cracked rubber hoses represents the most common, highly affordable solution for this frustrating mechanical issue.
Will A Dirty Air Filter Cause Mixture Problems?
- Absolutely, a severely clogged paper air filter heavily restricts the vital flow of fresh atmospheric oxygen.
- When you drive down dusty rural roads to buy farm compost, your filter catches massive amounts of dirt.
- The computer will try to compensate for the lack of oxygen, potentially throwing off the entire combustion balance.
- You should inspect your primary air filter at the beginning of every single spring planting season.
- Swapping a dirty filter for a clean one instantly restores lost horsepower and improves overall fuel efficiency.
Do I Need Professional Tools For This Job?
- Performing a basic sensor cleaning and visual inspection requires absolutely no expensive, specialized professional mechanic tools.
- A simple, inexpensive handheld digital diagnostic scanner reads the error codes directly from your dashboard port.
- Standard metric socket wrenches easily loosen the battery terminals and plastic intake clamps.
- Basic aerosol sensor cleaner costs only a few dollars at your local automotive parts store.
- These affordable household tools empower you to perform basic preventative maintenance entirely on your own.
Conclusion
Maintaining the sturdy utility vehicle you rely on to transport heavy gardening supplies requires patience, respect, and a willingness to learn simple mechanical tasks. By taking the time to gather the correct diagnostic tools, cleaning your delicate mass airflow sensors, and inspecting your thick rubber hoses for vacuum leaks, you guarantee a remarkably smooth driving experience. You no longer have to worry about your essential hauling vehicle sputtering or stalling while transporting massive terracotta pots home from the local plant nursery.
Knowing how to adjust fuel air mixture on fuel injection safely empowers you to prevent incredibly expensive mechanical breakdowns right in your own driveway. The noticeable improvement in your engine’s daily performance serves as a fantastic reward for your careful, deliberate troubleshooting efforts. Wash the dark engine grease off your hands, pack your sturdy gardening tools securely into the truck bed, and drive confidently toward your next beautiful botanical adventure knowing your reliable transport remains perfectly optimized!
About
Ora Hayes is a distinguished figure in the world of DIY Thecarfixes, with over a decade of expertise in automotive diagnostics and high-performance maintenance. Her professional focus lies in merging mechanical precision with modern digital tools, fostering repair solutions that are both cost-effective and highly reliable. As the author of Thecarfixes, Ora Hayes delves into the art and science of automotive restoration, inspiring car owners and hobbyist mechanics alike.
Education
RMIT University (Melbourne, Australia) Associate Degree in Automotive Engineering — Focus on vehicle dynamics, industry-driven repair protocols, and advanced diagnostics. Gained hands-on experience with traditional mechanical tools and modern ECU remapping software.
Nottingham Trent University (United Kingdom) Bachelor’s in Mechanical Design and Automotive Engineering (Honors) — Specialized in automotive systems with a focus on blending technical engineering with everyday usability. Participated in industry projects, working with leading automotive manufacturers to gain real-world insights into vehicle longevity.
Publications and Impact
In Thecarfixes, Ora Hayes shares her insights on troubleshooting complex engine issues, material durability, and strategies for efficient garage setups. Her writing bridges the gap between professional mechanic knowledge and the home enthusiast’s needs, making it a must-read for both everyday drivers and seasoned gearheads.