If you’ve ever tinkered under the hood or wrestled with a stubborn air conditioning system, the thought of removing freon might sound daunting, maybe even unnecessary unless the compressor groans or your vents only manage to blow lukewarm air in the heat of July. Still, for the home mechanic or anyone eager to save a few bucks (and have a clearer understanding of just what keeps their cabin cool), knowing how to take charge of this process offers real practical value. It’s more than money saved—it’s getting to know your machine from the inside out.
But let’s not kid ourselves: dealing with automotive refrigerants is risky, both to you and the wider world. Safety regulations (and legal restrictions) surround every step. Try cutting corners—at best, your AC won’t work; at worst, you’re damaging the environment while risking personal injury or a hefty fine. What follows is an unvarnished look at the safest, most responsible way to get the freon out of your car’s system without running afoul of regulators or, frankly, common sense. In this guide on how to remove freon from car AC, we’ll cover everything from the basics of refrigerants to the step-by-step process of safely removing them.
What Is Automotive Refrigerant?
When people talk about “freon” in cars, they’re usually referring to a class of refrigerant chemicals (sometimes using the brand “Freon” as shorthand) that make your A/C system tick. By cycling between gaseous and liquid forms as it moves through the coils and compressor, this compound absorbs heat from inside the car and dumps it out into the world.
For years, R-134a was the norm; these days, vehicles built after about 2014 lean toward R-1234yf, a formula designed to go a little easier on the atmosphere.

Safety and Legal Considerations
Let’s be clear: removing refrigerant is not like draining oil. Federal law, via the EPA, requires that all automotive refrigerants be recovered—never simply vented—using approved machinery. Getting caught “letting off steam” results not in applause but in fines that sting.
Always wear solid gloves and safety goggles; liquid refrigerant, especially under pressure, can freeze skin instantly and damage your eyes in a blink. And if you’re tempted to skip a step or use makeshift tools, remember that you’ll likely endanger not only yourself but also your neighborhood air.
Signs Your Car AC System Needs Refrigerant Removal or Service
What tips you off that it’s time to grab the tools or head to a shop? Well, if the air turns muggy instead of brisk when you crank up the A/C, trouble is brewing—often a leak or an all-but-empty system.
Sometimes you’ll hear a rapid clicking from the compressor clutch, or you’ll spot oily grime around those shiny metal fittings. If you’re planning to swap parts or chase down a real repair, extracting the leftover freon comes first.

7 Simple Step-by-step Guidelines on How to Remove Freon From Car
Step 1: Gather the Necessary Equipment
Alright, honesty time: without the right tools, don’t attempt this job. What you’ll need is pretty specific—an EPA-certified recovery machine (not some gadget from an online bargain bin), a DOT-rated recovery tank, a solid manifold gauge set, and personal safety gear. “Improvising” is one shortcut you do not want to take. Check that your tank is both empty and the correct type for your refrigerant. Hoses and fittings can’t be cracked, brittle, or dirty. Run through a mental checklist before you even open the hood.
Step 2: Put on Your Safety Gear
Here’s the part people sometimes gloss over. You really do need heavy gloves—ideally, the type mechanics use to handle freezing conditions—because contact with liquid refrigerant will instantly damage skin. Protective goggles aren’t optional. One stray burst to the eye, and the pain is the least of your worries. Ventilation isn’t a mere suggestion: perform the procedure outdoors if possible, or at the very least, in a space where air moves freely. Freon displaces oxygen with alarming speed; a sealed garage is a recipe for trouble.
Step 3: Locate the Low and High-Pressure Ports
Pop the hood and pause. Track down the service ports on your A/C system—there are two, one on the thicker tubing (low pressure, sometimes just an “L”) and one on the skinny pipe (high pressure, usually marked “H”). These aren’t universal connectors; mismatching them takes real determination. Give the area a good wipe with a rag, since even a trace of dirt getting inside can cause headaches down the line by wrecking the compressor or clogging the delicate expansion valve.

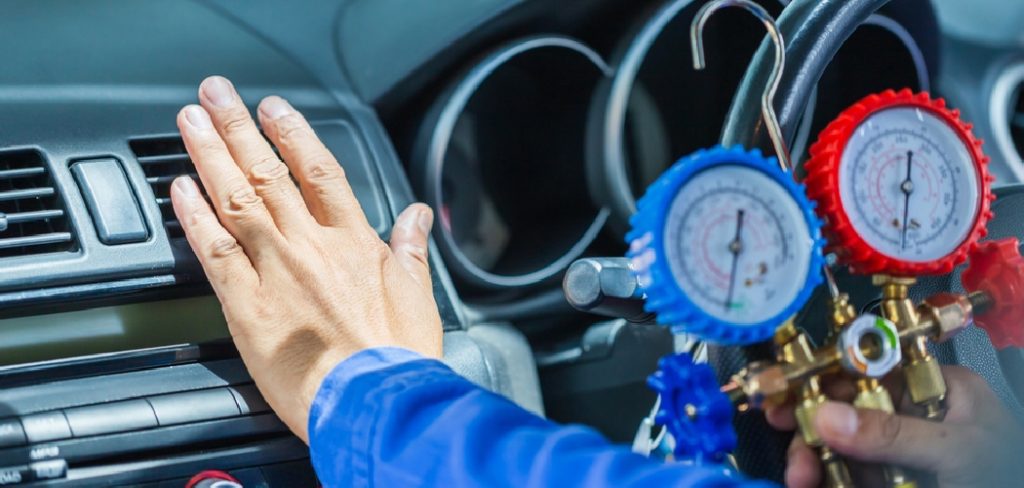
Step 4: Connect the Manifold Gauge Set
Valve position matters here. Before you do anything, make sure all the valves on the manifold are closed. The blue hose goes to the low-pressure port; push until it latches with an audible click. The red hose? That one’s for the high-pressure port. Do the same—click and lock. Only once both hoses are in place should you check the gauge readings. The yellow hose (center on the manifold block) links to your recovery machine. Leave the engine OFF at this point, or you’ll get surprise pressure swings.
Step 5: Attach the Refrigerant Recovery Machine
The yellow hose you just prepped connects to the input on the recovery machine. From the machine’s output, run another hose to your DOT tank. Wrenches are handy—secure these connections tightly, or you’ll lose refrigerant to leaks that are both dangerous and illegal. Place the recovery tank on a digital scale—not just any bathroom model; you want something that can handle refrigerant cylinder weight, so you aren’t guessing. Overfilling is a no-go: DOT regulations are firm about never exceeding 80% of a tank’s stated maximum, which allows for expansion.
Step 6: Extract the Freon Safely
At this point, you’re ready to begin. Start the recovery machine, gradually opening the low- and high-side valves on the manifold. Turn on the input and output valves of the machine, and finally open the recovery cylinder’s valve. The sound of the machine lets you know it’s working; if the gauges begin to dip, gas is moving. Patience pays here. Depending on your system and the day’s temperature, you could be waiting fifteen to forty-five minutes for those gauges to reach zero or even a gentle vacuum. Once you see that pressure drop, close everything down in this order: manifold valves, machine valves, then the tank.
Step 7: Store the Recovered Freon Properly
Extraction finished? Carefully disconnect each color-coded hose, recap the service ports with their dust covers, and make absolutely certain the valve on your recovery tank is locked tight. Remember, recovered refrigerant can’t go right back into your car—contaminants like moisture and used oil are now trapped in that cylinder. Store the tank on a stable surface, away from sunlight and heat sources. You’ll need to haul it to an authorized recycling center or an auto store that takes this kind of hazardous waste. Please, don’t tuck it in the corner to “deal with it later.”

Following these steps on how to remove freon from car AC system can help reduce the harmful effects of releasing refrigerants into the environment. It is important to properly dispose of recovered refrigerant in order to prevent air pollution and protect our planet’s ozone layer.
Environmental Impact of Freon Release
The stakes go far beyond your garage. Uncontrolled release of refrigerant—especially older R-134a—ramps up greenhouse effects astonishingly fast. These chemicals linger in the atmosphere, trapping heat, sometimes up to a thousandfold more efficiently than carbon dioxide, and they can even degrade protective ozone.
Responsible recovery and recycling are not just regulations for bureaucrats to enforce; they’re one of the few, tangible ways individuals can help protect the planet from needless harm.
When to Visit a Professional Mechanic?
Honestly, unless you own or have easy access to proper recovery machinery, you’re better off calling in a professional. Trying to jerry-rig your way through this job—opening a valve with a screwdriver or rigging a cheap vacuum pump—puts you at weird legal and physical risk.
And if your system’s compressor completely failed, expect to find metal shavings and possibly gunked-up lines. Professional shops use tools that can flush and clean much more thoroughly than anything available to the home enthusiast.
Cost of Professional Refrigerant Removal (General Info)
On the financial side, hiring a certified mechanic to evacuate your AC system isn’t usually wallet-busting. Most shops quote something between $50 and $150 for the procedure, with variations depending on geography and vehicle specifics. Sometimes, the fee slides downward if you go on to have other repairs or a recharge done at the same place.
Compare that to spending several hundred dollars on equipment you’ll use once—do the math, and the appeal of just letting the pros handle it becomes obvious.
Maintenance Tips to Avoid Refrigerant Issues
A/C systems don’t like to be ignored. Find excuses to run the air conditioner at least a few minutes every couple of weeks, even in winter, to keep seals supple and oil circulating. Small leaks are surprisingly common as the system sits. If you want to play it safe, have a technician check pressures and system health every few years.
As inconvenient as it sounds, an ounce of prevention (and a blast of cold) is vastly cheaper than a big repair when lines or the compressor finally give out.
Frequently Asked Questions
Q1: Can I Vent Freon Into The Air?
No, you absolutely cannot—by law, by conscience, by any reasonable standard. The EPA hands out hard penalties for anyone intentionally venting A/C refrigerant. Always use certified equipment to do the job right.
Q2: Do I Need A License To Handle Car Refrigerant?
If you’re just maintaining your own car, no license is technically required. However, professional mechanics servicing customer vehicles for pay must hold proper EPA Section 609 certification. Regulations around safe handling and disposal, however, apply to one and all.
Q3: What Happens If I Inhale Freon Gas?
Brief exposure—say a quick whiff—may lead to dizziness or a headache. In serious cases, especially with heavy inhalation, the situation can quickly move from disorientation to unconsciousness or even heart problems. Freon displaces oxygen, which could, unfortunately, make things turn life-threatening before anyone realizes what’s happening.
Keep Your Vehicle Cooling Safely
Treat your car’s air conditioning with the respect it demands, and you’ll be rewarded: a smoother ride, fewer repair bills, and the reassuring knowledge that you’ve kept both yourself and the environment out of harm’s way. These steps are not a contest in speed. They require patience, careful attention, and usually, the right machinery.
If ever you get that uneasy feeling—maybe unsure about the equipment or the next step—the smartest move is also the safest: call a qualified technician. No point risking your car or your safety for the sake of a shortcut. Thanks for reading this guide on how to remove freon from car.
About
Ora Hayes is a distinguished figure in the world of DIY Thecarfixes, with over a decade of expertise in automotive diagnostics and high-performance maintenance. Her professional focus lies in merging mechanical precision with modern digital tools, fostering repair solutions that are both cost-effective and highly reliable. As the author of Thecarfixes, Ora Hayes delves into the art and science of automotive restoration, inspiring car owners and hobbyist mechanics alike.
Education
RMIT University (Melbourne, Australia) Associate Degree in Automotive Engineering — Focus on vehicle dynamics, industry-driven repair protocols, and advanced diagnostics. Gained hands-on experience with traditional mechanical tools and modern ECU remapping software.
Nottingham Trent University (United Kingdom) Bachelor’s in Mechanical Design and Automotive Engineering (Honors) — Specialized in automotive systems with a focus on blending technical engineering with everyday usability. Participated in industry projects, working with leading automotive manufacturers to gain real-world insights into vehicle longevity.
Publications and Impact
In Thecarfixes, Ora Hayes shares her insights on troubleshooting complex engine issues, material durability, and strategies for efficient garage setups. Her writing bridges the gap between professional mechanic knowledge and the home enthusiast’s needs, making it a must-read for both everyday drivers and seasoned gearheads.